Thursday, December 31, 2009

Window Mistreatments

I've officially joined the window "Mistreatment" club at The Nester's.


Oh, just the club I need to join. I've been procrastinating making curtains for my Master bedroom and came up with this lovely idea!! My husband still laughs each time he looks at them. Mistreatments is the perfect word.


(note: they are 95" curtains folded in half and hung on rings. sad, I know.)


How to throw the party of the season | mydeco

How to throw the party of the season | mydeco


1930s style glamour


Saturday, September 5, 2009

Addicted To Throw Pillows

Hi, my name is Debra and I am a throw pillow addict.

I admit that not only do I feel the need to change throw pillows frequently, and I hoard fabrics for that purpose, and I stash pillows in my attic -- I also try to get others to join in my addiction. I am hopeless!

Here is a new thing I recently (did to serve my addiction) ahem -- came up with. Quick and Dirty New Throw Pillows!!

My little "behind your head when reading" pillows were showing dirt and wear so... I took two little pieces of an "end of the bolt" wonderful bargin fabric I had in the attic.


 Cutting the pieces just a little bit larger than the top piece of fabric, I simply folded it over at the edges and began to sew with my large turkey needle. I carefully grabbed a piece of the trim with each stitch and tried to keep the fabric right along that edge.


And here is my completed "new" throw pillow! I did one more for the other side of the couch too. (I love symmetry in my world) Bonus! Look closely at the largest pillow at the back and YES, I admit it, it is a Quick and Dirty Throw Pillow also. I used left-over fabric from the breakfast room chairs on the fronts of these pillows.

Happy sewing and best of luck with your home addictions.

Wednesday, August 5, 2009

Lake House Kitchen Backsplash Project!!

Here is Steve and Lexie sorting out the kitchen the first summer we visited the Lake House. Notice the grey backing board on the backsplash. At the time not even the electric outlets were fastened to the all and had no plug covers. The previous owners had planned to tile this area but didn't get to it. And neither did I that summer or the next...

So, first I took down the boards and decided to paint to match the rest of the room. The backing was plain old paneling so I used some kiltz before trying to cover the wood. It took several coats but it finally came out very nice.

In between coats I touched up the white cabinets.


Then I painted two unfinished pedestals white to match the cabinets and placed one at each end of the upper cabinets for effect.
What a nice vacation kitchen! All ready for next time.

The Lake House Kitchen Floor Re-do!


One of the biggest projects that needed completion at the Lake House was the kitchen. The tile floor grout was chalky and breaking off making a mess everywhere. We had a big rug over it for the past two summers but I decided to tackle the job once and for all. (I hope!) Having never done more than the two table tops of broken tile before I was really worried that I would just make it worse.

The girls and I took two days to get it done. First, began gouging out the loose grout with flat head screwdrivers. Probably not the safest way but it worked for us. Then I vacuumed and began grouting according to the directions on the ready-made grout purchased at Lowe's.

The first side came out good! So we walked carefully walked around the newly grouted tiles and admired our success.
The next day we really worked hard to get all the grout up that was damaged. We had to replace two tiles that came up with the grout chopping, so thankfully, we had extras around. (I used those two damaged tiles for the tabletop project.)

Here I am (with sore knees) adding grout to the last section of tiles. I know I took a photo of the girls working on the grout but it must be on one of the phones and not the camera's so I'll add that later. Anyway, the floor came out so great! I'm really proud of our work. Next, the backsplash!

Wednesday, July 22, 2009

Continuing the Kitchen Re-Do at the Lake House

First, the desk in the kitchen has now been moved to the "sewing room" for my projects (formerly the girl's room) and the guest room too. So, it was decided to use another really great table for the center island. Then after it's first use, it was apparent that the wood veneer tabletop would never make it long term -- so we came up with the idea to use a few pieces of left over tile! Voila!


I broke up everything into pieces except a short section of white octagons and little red squares that I found in the workroom. Then I used a white tile to highlite around those octagons and squares. The beige tiles are from the floor.

Lexie came up with the "stream of tiles" design and I think it is perfect!

Tiling the top of a great little wooden table to use as a place to serve. New floor and "new" table.

Monday, June 1, 2009

Cute Idea for Summer House Decor From "Beach Vintage" blog:


Some time ago I feel in love with a gorgeous girl's vintage swimsuit for sale on EBay. I had no idea what I would do with it at the time. I was lucky enough to win the auction. When it arrived I decided it was to wonderful to just put away in the cupboard, so I decided to frame it. I bought this white frame at Ikea and placed the swimsuit inside. At present it hangs in my guest bathroom and always gets lots of comments from friends. It really is a simple idea and I am sure anyone could do it! Next Friday I will show you how I expanded on this idea. Have a great weekend (a long weekend in Queensland), so I shall be back on Tuesday. I am hoping for one last swim in the ocean before it gets too cold!


and more...


Some time ago I saw some images of a house in the USA where the owner had framed some vintage swimsuits. I put it in my scrapbook for future inspiration. I used the idea last year when we moved into our new home. I decided our dining room would be most appropriate for them as it would create a great talking point. It took some time to buy the vintage bathers, they are hard to find! All of them came from Ebay USA. So the shipping cost a little more than I would have liked but the end result was well worth the time and money spent. The simple wooden frames are from Ikea. I have to admit, I tried a few of them on before I framed them, and danced around the room to Frankie Avalon. How sad is that?

Thursday, May 7, 2009

JLyn Design Jewelry

A wonderful new webpage for handmade jewelry. Exquisite, unique designs. Please visit her page and buy something wonderful!!
Wow, thanks to my friend Debra aka Bottle Blonde Inspirations I'm officially a blogger. These pages will be a place for me to post pictures of my latest Jewelry Designs. I've been creating Jewelry for about 5 years. Each piece is an original design that is crafted by hand, my hand to be specific. I work with metals such as Fine Silver, Sterling, Copper, Vermeil and 14kt Gold Fill. The variety of stones I use range from Semi Precious Gems such as Aquamarine, Peridot and Amethyst to custom made Cubic Zirconia, Swarovski Crystal and Pearls. Most pieces end up being one of a kind just because I make something and move on from there though I do have a few "in demand" designs that I've made several times but always with slight variations. Check out my work and let me know what you think.
Thanks,
Judy

Sunday, May 3, 2009

New Trends and Good Ideas

Lighten up your colors in the bedroom. Think calm. Use a corner of your bedroom for morning snacks or checking the weather on your laptop.

Add fresh flowers to your rooms. And real live plants.


Freshen up your back entry. Take away the coats, sweaters, and boots and add a few summer straw hats.

Happy Summer!!

Saturday, May 2, 2009

Sweet Dreams

View this post from La Dolce Vita, one of my favorite homestyle blogs, for more exquisite bedrooms:

Ah! Loving this room!

Thursday, April 30, 2009

Finally! The New Sewing Project Revealed!

~ DON'T FORGET TO CLICK ON THE IMAGES FOR LARGER VIEWS~

We use our back patio so much, it is really an extension of our home. We're either sitting out by the pool, in the pool, watching tv, eating, you name it. It was time to make a beautiful area fresh again but with no funds allocated...a brainstorm! What about cheap canvas paint cloths? I'd seen people use them for curtains outside, so why not for cushion covers?

First I bought two packages of the largest size drop cloths. They come in long lengths with about a good width. I ended up needing one more so this photo is of the smaller size. The 8 oz. weight is perfect and very easy to work with.

Here is one of the sad faded cushions before being covered. The cushion behind it was measured, cut and sewn like a pillow case on three sides.

This photo shows how to make the box corner on the two top already sewn corners. Just pull up the corners with the seams together and sew a little triangle across.

Turn the cover right side out. Slip the cushion inside like a pillow, then fold and tuck the corners of the unsewn bottom to make the box corners and pin. Then just sew a slip stitch across the bottom length of the pillow.


Here are three of the bottom pillows for the two chairs and settee. Almost there!

Before


After!


Lexie couldn't wait to get out there on the settee and chill! (The little footrest is still to be given a fresh face.)

View to the rest of the patio (still in progress).


A new rug from Target and we're looking good. Everything for under $100. Now the pool ...

Thursday, April 23, 2009

Black Kitchen Cabinets Inspiration


These photos are from one of my favorite decorating blogs, The Lettered Cottage. Go here to see the process.

The Lake House

Here are some photos from our Lake House in Missouri. We are so looking forward to going again this July. It is a wonderful little house with lots of projects for me and hubby. I load up the van with items from the great stores around here and the attic and lots of ideas to make the house a home.


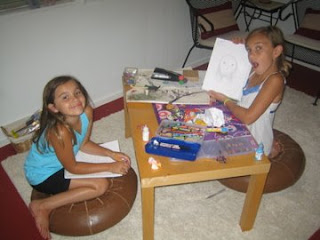
Here are Maia and Lexie having fun in their front porch craft room. I wish you could see the "before" of this little porch. My Dad helped me paint the walls and floor. From the porch is the front door that opens into a colorful dining room.


This is the dining room, already painted such a great deep coral red. The table and chairs were left from the owners but hubby and I bought the baker's rack to create a bar. We hung the hanging light that has hung in every home we've lived in since the boys were little. What you don't see in this picture is the great big window that looks out into the craft porch. We do everything at the table: computers, sewing, and lots of eating.

Off the dining/kitchen is the master, guest and bathroom.


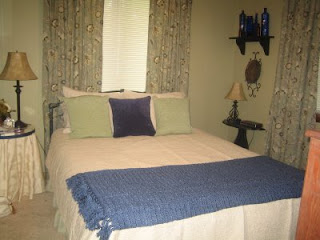
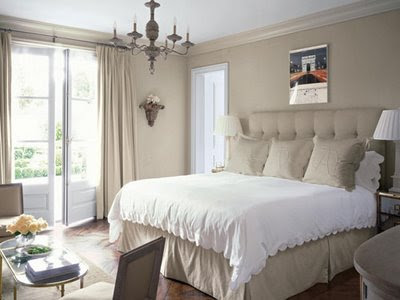
This is the master bedroom decorated in light green and blue with the bedding and curtains from Walmart. (the only department store in miles and miles.) This room was the only one not painted so I went the the same light green as the living room.


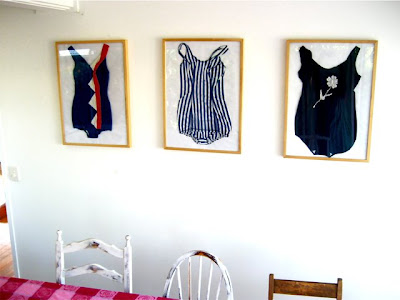
Here is the other wall display. Everything is from Michaels or our attic. This photo was taken with the previous owner's bedding. There are also photos of the bathroom and the guest room that I'll post later.

The dining room is open to the kitchen.

This is the only photo of the kitchen that I have right now. Hubby was organizing for me (he's into that stuff !!). The "island" is a desk from Walmart that I painted to match the dining room table and chairs. We plan to paint the cabinets black this summer and take the doors off the top cabinets. I'll add photos of our inspiration kitchen soon.

From the kitchen is the living room. The couches and chair were already there. I made the throw pillows and bought some from the Dollar Store. It is fun trying to find things in the little stores in the neighboring towns. I love the paint color for the walls. We were so lucky that the previous owner did such a good job choosing paint colors. There is a patio sliding door that we don't use. I'm hoping to change it to french doors one day.


This is my next project: the back porch and patio. We hope to change the sliding doors to new french doors (maybe still sliding though.) I want to plant roses and make more flower gardens. Since this picture was taken I put more chairs on the porch.


Here is the reason I fell in love with this little house! The backyard!! Look at the trees and all the shade. I had new rock put in for the driveway and walkways. Just give me a few years to get it looking just right. (that is hubby's Dad's cabin across the road.)

come back soon for Lake House updates.

Thursday, April 16, 2009

Photos From the Final Frontier - ABC News

Photos From the Final Frontier - ABC News

My previous Garden

The front sitting area with pretty pansies.

The lovely side garden. It is just beautiful this time of year.

The walkway to the pool area. The arbor is just barely upright from the roses.


More Ladybanks roses in bloom. This area is where my sister was married.

I just had to share the flowers. Enjoy!

Catching Up on Social Media

In 2018, I stopped posting here as I was using Facebook to interact with my family and friends. Now I’ve added an account on Instagram so I ...